Setting strict, custom limits for LinkedIn activity is one of the most important ways to keep your account safe from restrictions—while scaling outreach in a sustainable way. Outboundry streamlines this process, so you control how many automated actions (like connection requests, messages, and visits) your LinkedIn account performs each day.
Why Adjust LinkedIn Account Limits?
Stay within LinkedIn’s safety thresholds to avoid bans or warning messages.
Prevent sudden spikes in activity, which can trigger platform security checks.
Customize your outreach pace as your account warms up and engagement rates improve.
Step-by-Step: Set Daily LinkedIn Limits in Outboundry
Follow these easy steps to configure your safe activity limits directly within the Outboundry dashboard:
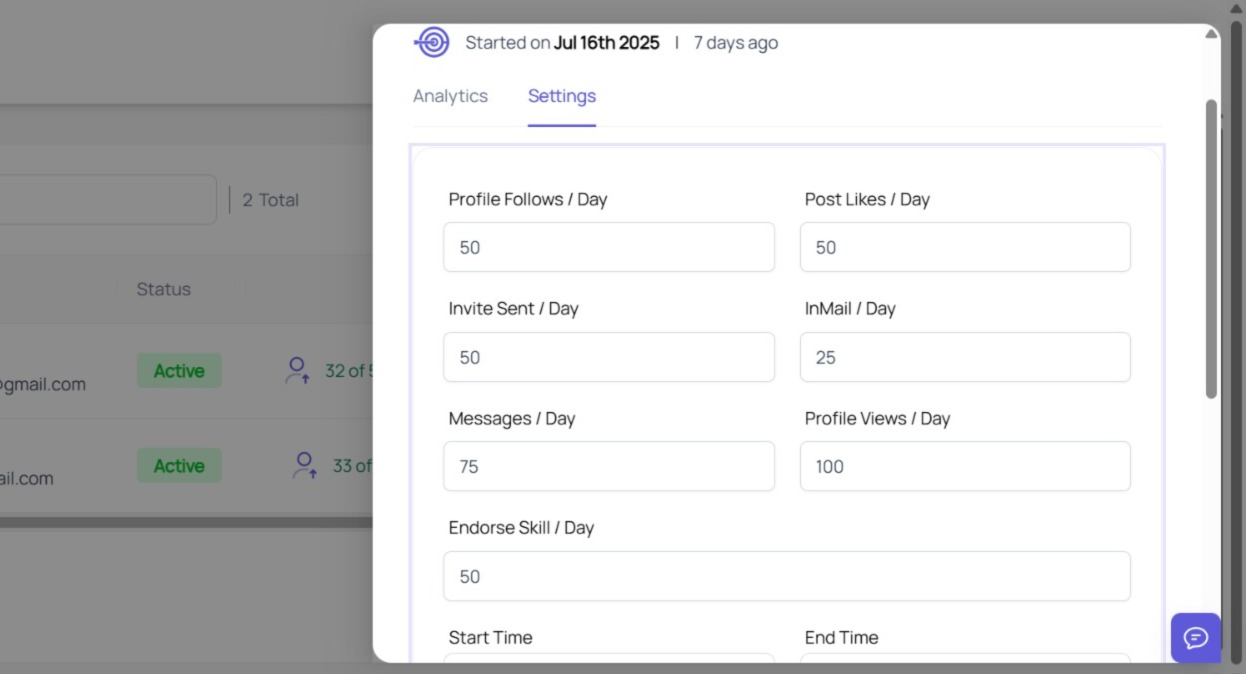
1. Access Your LinkedIn Account in Outboundry
Log in to your Outboundry dashboard.
Go to the LinkedIn Accounts section, where all your connected senders are visible.
2. Navigate to Account Settings
Click on the LinkedIn account you want to configure.
In the account view, locate and select the Settings option (typically a gear icon or menu item).
3. Define Daily LinkedIn Limits
Inside the settings menu, you’ll find options to set daily limits for key LinkedIn actions. You can specify:
Connection Requests per Day:
Enter the maximum number of new connections to be sent daily.
Best practice: 20–25 connection requests per day for standard accounts.Messages per Day:
Set the number of personalized messages to 1st-degree connections.
Recommended: Up to 30 messages per day.Profile Visits per Day:
Limit how many unique profiles are visited daily.
Suggestion: 30 profile visits per day is a safe starting point.InMails and Other Actions:
If enabled on your account, define limits according to your subscription plan.
4. Save Your Settings
Once your preferred limits are entered, click Save or Update.
These rules will now apply automatically—Outboundry will not exceed your defined limits, distributing actions evenly throughout the day for a natural activity pattern.
5. Monitor and Adjust Regularly
Track your LinkedIn dashboard and Outboundry analytics for messages, invites sent, and acceptance rates.
Gradually increase limits only when your acceptance rates are high and your account is established.
If you receive a warning or restriction, lower your limits immediately and withdraw pending invites before resuming outreach.
Best Practices and Safety Tips
Start Slow: When using a new or previously inactive LinkedIn account, begin with the minimum limits and increase gradually week by week.
Avoid Sudden Changes: Large jumps in daily activity can trigger LinkedIn’s anti-spam measures, even for Premium or Sales Navigator users.
Withdraw Pending Invites: Regularly clear out unaccepted invitations to keep your acceptance rate healthy and avoid maxing out limits.
Respect Account Type: Limits are lower for free accounts; premium and aged accounts can slowly ramp up safely.
Example Table: Recommended Starting Daily Limits
Action Type |
Safe Daily Limit |
|---|---|
Connection Requests |
20–25 |
Messages |
30 |
Profile Visits |
30 |
You can always return to the Settings menu to adjust these as your campaigns and needs evolve.
Summary
Setting and fine-tuning LinkedIn account limits is fast and simple in Outboundry: just select your sender, open their Settings, and define the daily thresholds for each action. By following these steps and monitoring results regularly, you’ll reach more prospects safely while protecting your LinkedIn profile from unwanted restrictions.